Branch Templates
In modern software development, effective branching strategies are essential for managing source code efficiently in software development. Calibo Accelerate enables you to create branch templates—predefined sets of Git branches that ensure consistency and enforce best practices across your products. Users can define and manage branches as part of these templates to standardize development workflows.
Additionally, the platform provides branch-level access control, allowing you to manage which users can perform push and merge actions on specific branches within a repository. Branch templates can be configured at both the platform level and the feature level, offering flexibility to meet diverse development and release needs.
What is a Branch Template?
A branch template defines the standard Git branches (such as master, dev, qa, prod) and the pull/merge workflows between them. It acts as a reusable blueprint that governs how source code progresses through the software development life cycle, from initial development to staging and production.
These templates are applied to your source code repositories when technologies are added in the Develop phase of a feature in Calibo Accelerate.
Why Use Branch Templates?
Branch templates promote:
-
Consistency: Every product or feature follows a predictable and standardized branching strategy.
-
Reusability: Define once and reuse across multiple features or products.
-
Governance: Enforce code flow policies, merge directions, and prevent adhoc branching.
-
Speed: Automatically reflect the branch structure in your connected source code tool (GitLab, GitHub, etc.).
Where to Define Branch Templates?
Branch templates in Calibo Accelerate can be defined at two levels:
-
Platform Level (Global Templates):
Define templates under Platform Setup > Standards > Branch Templates. These are reusable across all product and features. -
Feature Level (Custom Templates):
In the Develop phase of a feature, you can:-
Select a global branch template.
-
Customize it to meet specific needs (for example, add/remove branches).
-

Note:
If you customize the global branch template at the feature level, the change will apply only to that specific feature. This customization does not modify the global branch template itself.
Common Branch Templates in Software Development
When you design a branch template, create branches that align with your typical software development and deployment stages.
The following table describes commonly used branches and their purposes in a typical software development and deployment workflow.
| Branch | Purpose |
|---|---|
| Master / Main | The production-ready codebase. Stable and deployable at all times. |
| Dev | Active development branch where features and bug fixes are merged. |
| QA | Used by the QA team for validation and testing before a release. |
| Demo | Optional. Can be used for client demos or UAT environments. |
| Pre-prod | Optional. Mirror of production for final deployment, tagging, or rollback. |
| Alpha | Early-stage development and integration testing. Used to integrate multiple feature branches before moving to a more stable test environment. |
| Beta | Testing with a broader internal or external audience (e.g., UAT or beta users). Used for identifying bugs and gathering feedback. |
| Gamma | Final staging environment before production. Used for last-minute testing, performance checks, and approvals. |
Creating a Global Branch Template at the Platform Level
Follow these steps to create a global branch template:
-
Sign in to the Calibo Accelerate platform and click Configuration in the left navigation pane.
-
On the Platform Setup screen, in the Standards tile, click Configure.
-
On the Standards screen, click Branch Templates.
-
To create a new branch template, click +New Branch Template.
-
In the Create New Branch Template panel, provide the following information:
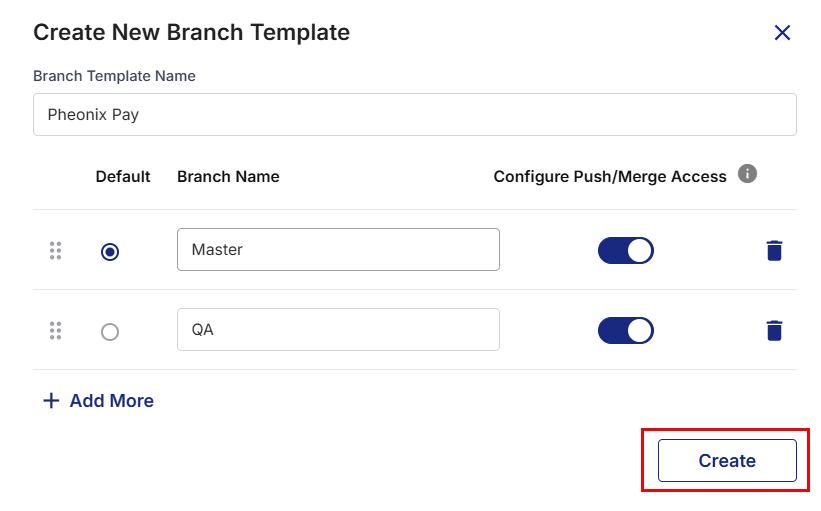
| Field | Description |
|---|---|
| Branch Template Name | Enter a name for the branch template. |
| Default | Select the radio button to mark a branch as the default branch. |
| Branch Name | Enter the branch name. |
| Configure Push/Merge Access | Enable the toggle to configure push and merge access control for the branch during the development phase. |
| + Add More | Click + Add More to create another branch |
-
Select Create to save the branch template.
-
The branch template you created will be listed on the Branch Templates page.
Configure Branch Template in Develop phase
Follow these steps to configure a branch template in a Develop phase:
-
Navigate to the Develop screen of the desired feature.
-
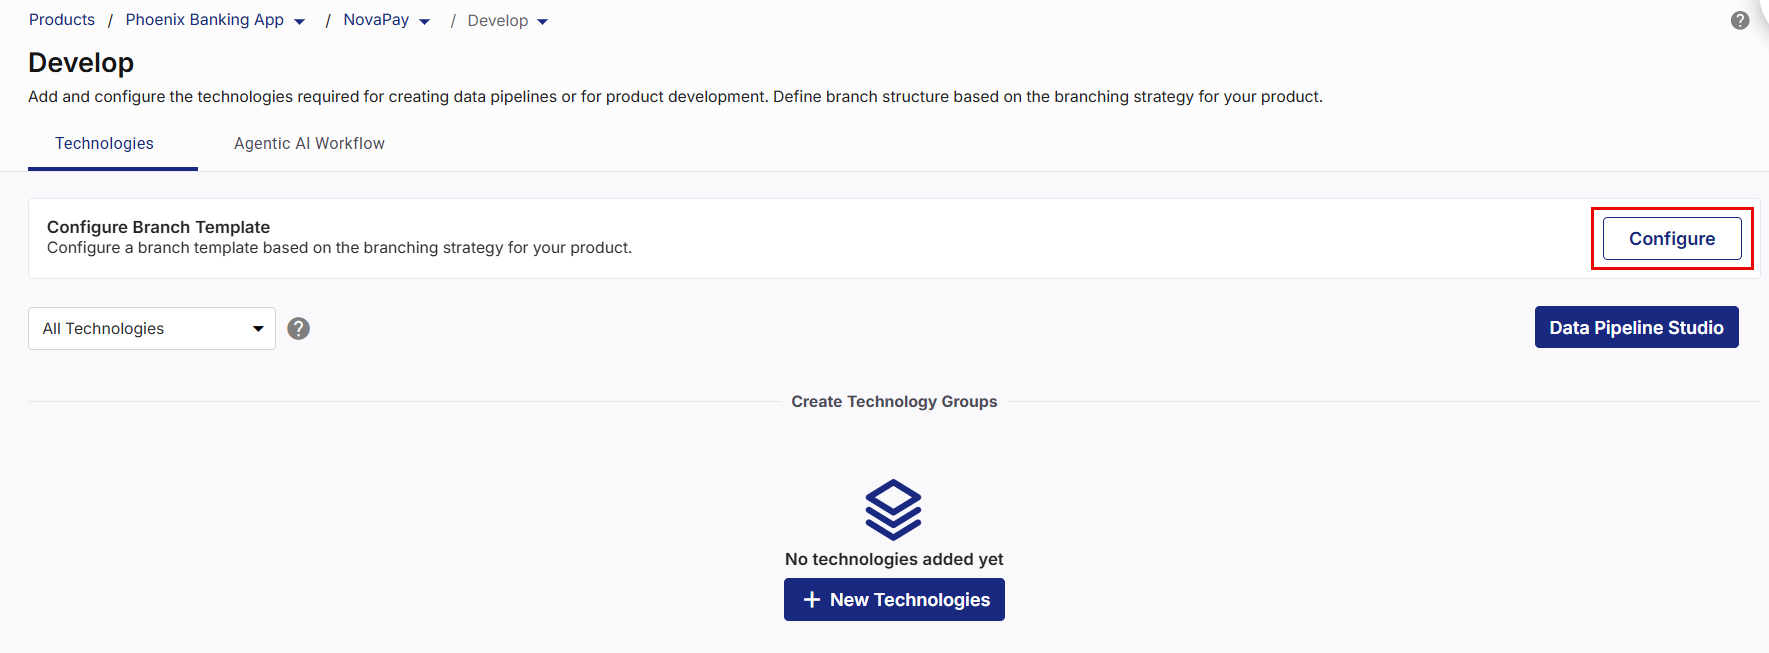
On the Develop screen, click Configure.
-
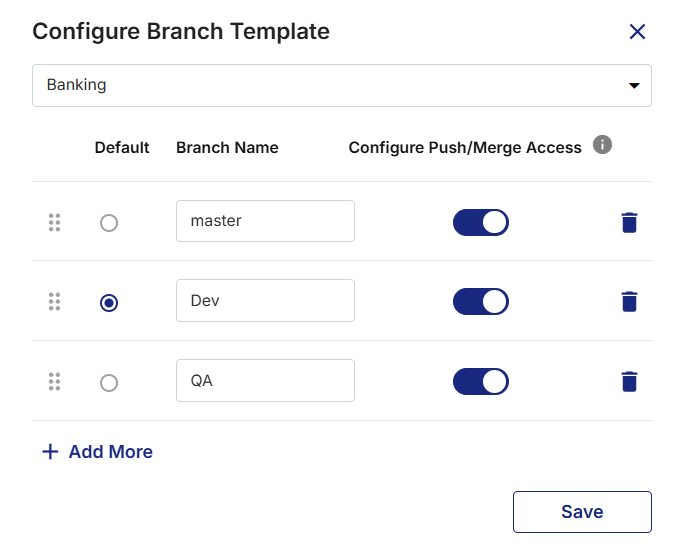
On the Configure Branch Template side panel, you can create a new branch template from scratch or select a global template. You can use the selected template as is or customize it to meet your requirements.
-
After you complete all customizations, click Save. Your branch template is now configured.
-
After you add technologies (for example, Node.js, Java, or Angular) to a feature:
-
Calibo reflects the defined branch structure in the integrated source code management tool (for example, GitHub, GitLab, or Bitbucket).
-
This ensures that developers follow the approved branch strategy.
-
Note:
If you add technologies before configuring a branch template, only the default main branch is created in the source code repository. Configure a branch template before adding technologies to automatically create all configured branches.
Manage Branch Access
The Manage Branch Access feature allows you to control which users can perform push and merge actions on specific branches within a repository.
Follow these steps to manage branch access settings:
-
Navigate to the Develop section.
-
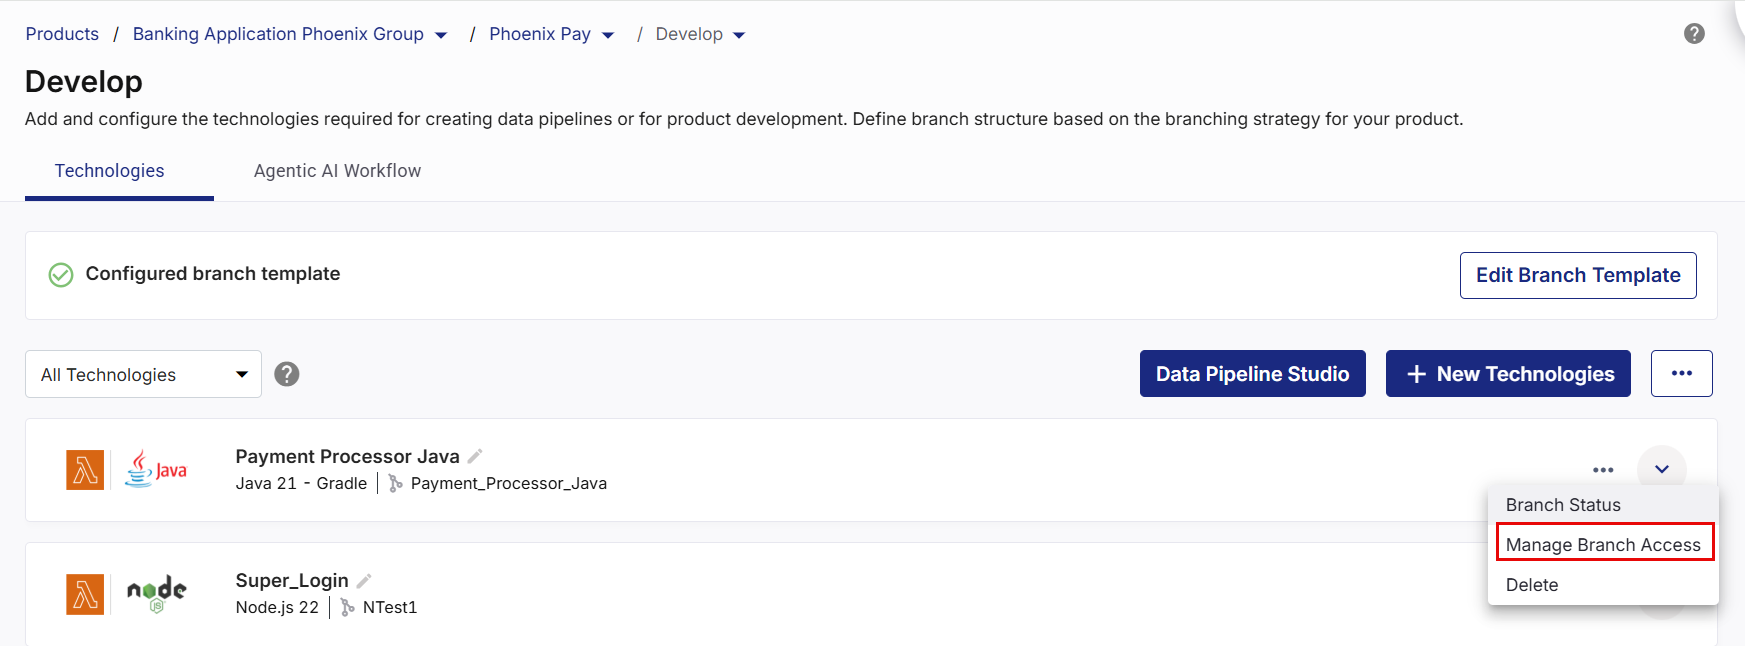
From the Technologies tab, locate the required technology.
-
Click the ellipsis (…) next to the technology you added.
-
Select Manage Branch Access from the dropdown menu.
-
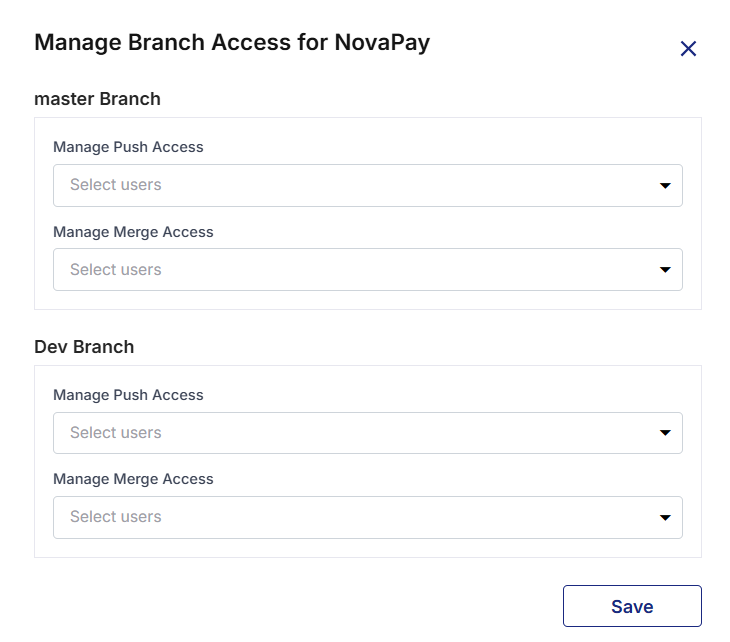
In the Manage Branch Access panel, configure access for each branch:
-
Select Branch: View the list of branches configured in the branch template (for example, master, dev).
-
Manage Push Access: Under Manage Push Access, select users who are allowed to push code to the branch. Use the dropdown to select one or more users.
-
Manage Merge Access: Under Manage Merge Access, select users who are allowed to merge code into the branch. Use the dropdown to select one or more users.
-
Repeat for Each Branch: Configure access settings individually for each branch.
-
-
Click Save to apply the access settings.
Editing a Branch Template
You can edit branch templates at the global level or at the feature level. To edit a branch template, do one of the following:
Edit Branch Template at Global level
Follow these steps to edit a global branch template:
-
Navigate to Configuration > Standards > Branch Templates.
-
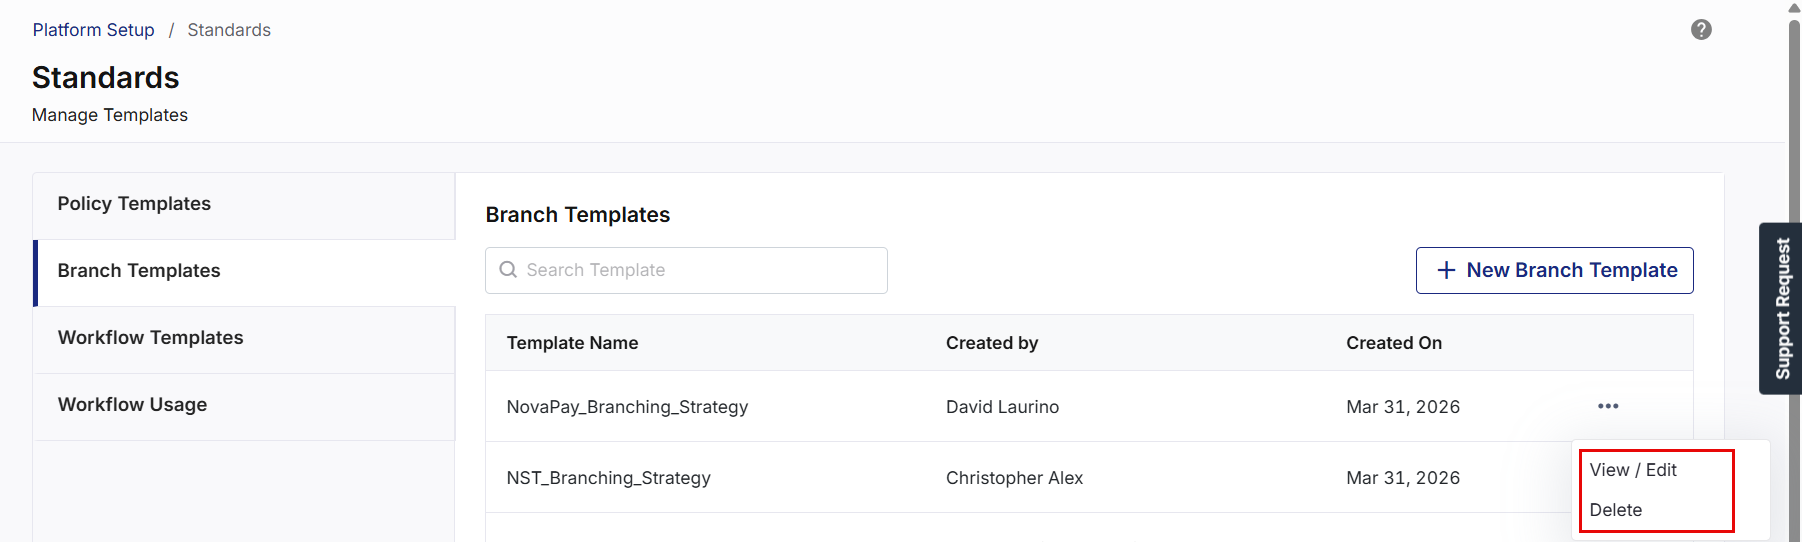
In the Branch Templates list, locate the template you want to modify.
-
Click the ellipsis (⋯) on the far right of the template row.
-
From the dropdown menu, select View / Edit.
-
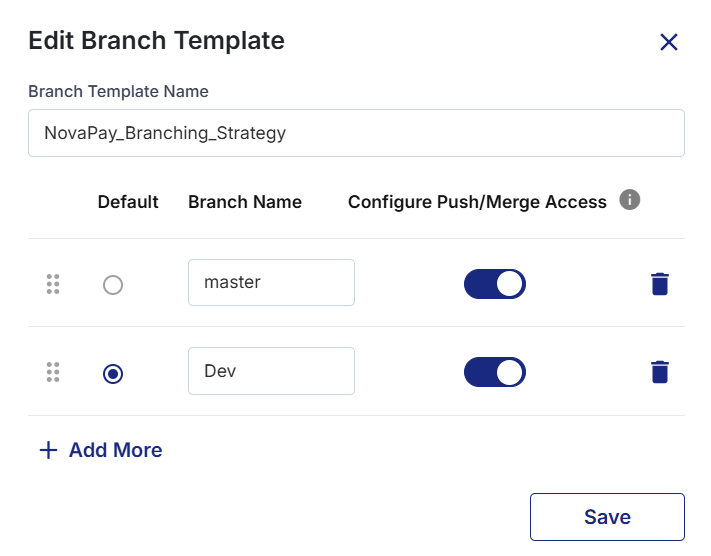
In the Edit Branch Template side panel:
-
Update the Branch Template Name if required.
-
Modify branch details:
-
Change the Default branch selection.
-
Edit Branch Names.
-
Enable or disable Configure Push/Merge Access.
-
Add new branches using + Add More.
-
Delete branches using the delete icon.
-
Use the drag handle
 to reorder branches.
-
-
-
Click Save to apply the changes.
Edit Branch Template at the Feature Level
Once a branch template is configured for a feature, you can easily make updates by editing the template directly from the Develop phase.
Follow these steps to edit a branch template for a feature:
-
Navigate to the Develop screen of the desired feature.
-
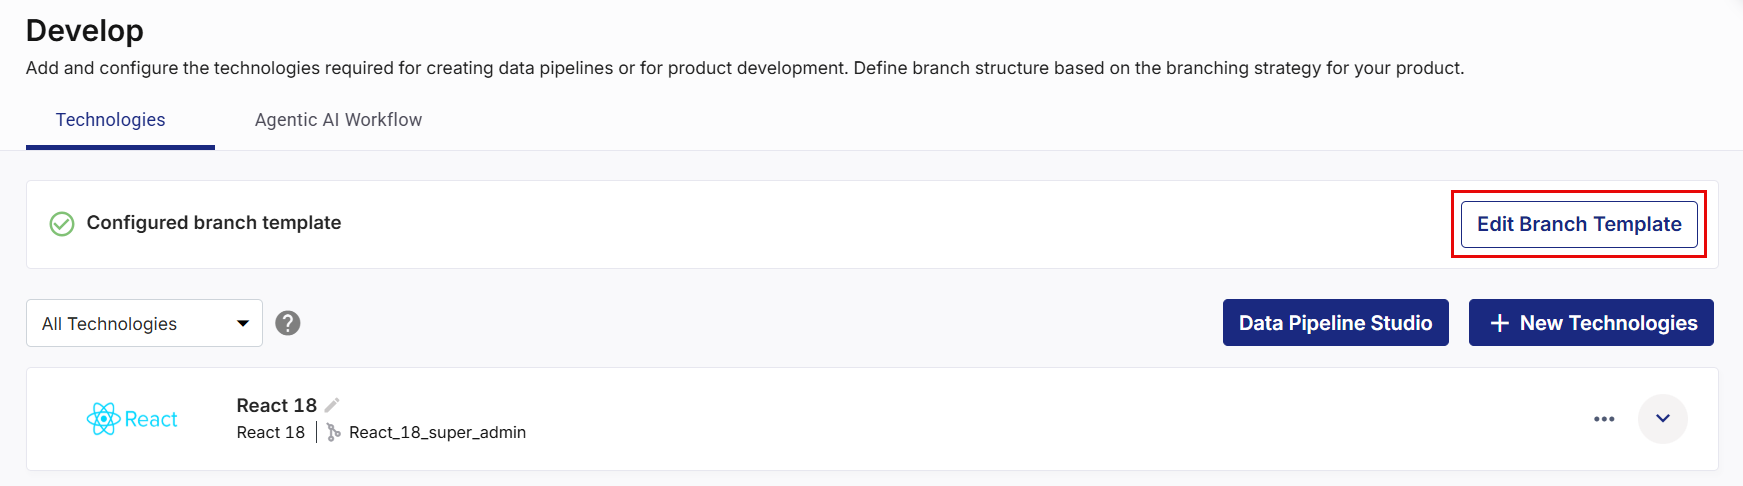
Click the Edit Branch Template button located in the Configured branch template section.
-
The Edit Branch Template screen will open, showing the current branch details.
-
In the Edit Branch Template panel:
-
Update the Branch Template Name if required.
-
Modify branch details:
-
Change the Default branch selection.
-
Edit Branch Names.
-
Enable or disable Configure Push/Merge Access.
-
Add new branches using + Add More.
-
Delete branches using the delete icon.
-
Use the drag handle
to reorder branches.
-
-
-
Click Save to apply the changes.
-
In the Save Changes confirmation dialog, do one of the following:
-
Select Apply these changes to existing technologies to apply the updated branch template to all existing technologies that use this template.
-
Leave Apply these changes to existing technologies cleared to save the changes only to the branch template. Existing technologies are not updated. Only technologies created after this update use the revised branch template automatically. Existing technologies continue to use their current branch configuration until the newly defined branches are created manually from the Branch Status side panel.
-
-
Click Save to confirm your changes or click Cancel to discard them.
View Branch Status
The Branch Status option lets you view the status of the branches configured for a technology. It shows whether each configured branch has been created in the source code repository and lets you create branches that have not yet been created.
Follow these steps to view the branch status:
-
Navigate to the Develop screen of the desired feature.
-
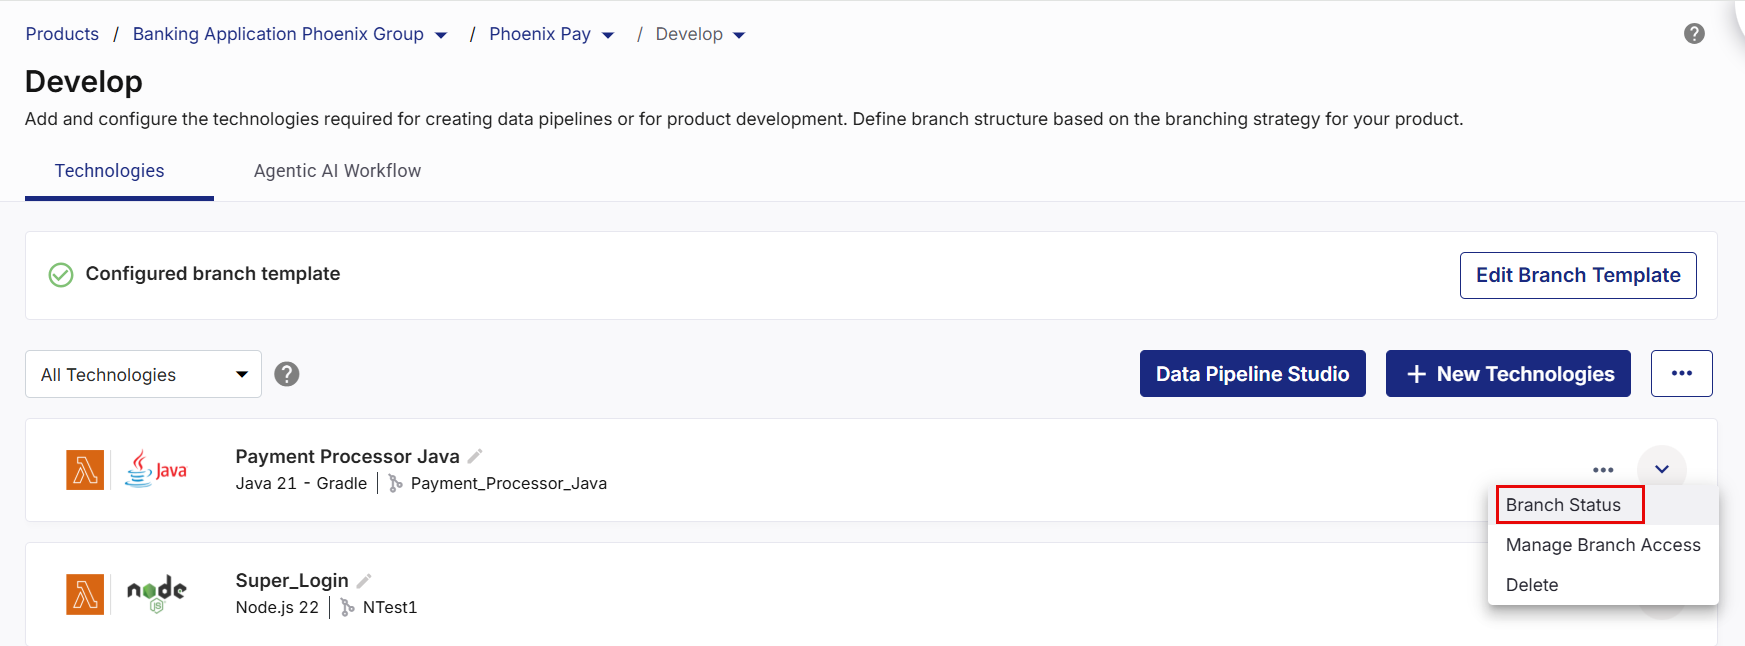
From the Technologies tab, locate the required technology.
-
Click the ellipsis (...) for the technology, and then select Branch Status.
-
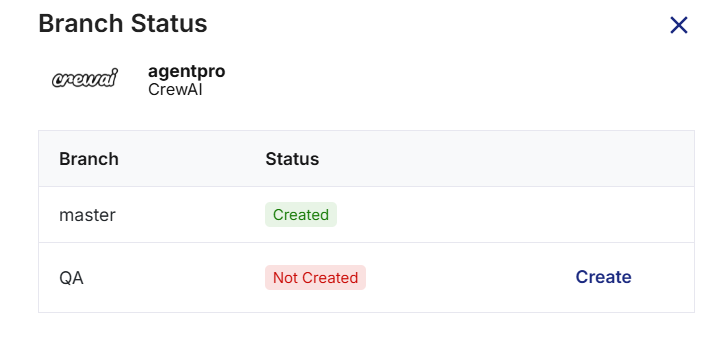
The Branch Status side panel opens and displays the configured branches for the selected technology.
-
For each branch, the following information is displayed:
Field Description Branch Displays the name of the configured branch. Status Displays the current status of the branch:
-
Created – The branch already exists in the repository.
-
Not Created – The branch has not yet been created in the repository.
-
-
If a branch displays the Not Created status, click Create to create the branch in the repository.
-
After the branch is created successfully, the status changes to Created.
-
Click Close (✕) to close the branch status side panel.
Note:
Branches created from the Branch Status side panel are based on the branch template configured for the technology. If you save changes to a branch template without applying the changes to existing technologies, you must manually create the newly added branches from the Branch Status side panel for each affected technology.
Delete a Branch Template
Follow these steps to delete a branch template:
-
Navigate to Configuration > Standards > Branch Templates.
-
Locate the template you want to delete in the Branch Templates table.
-
On the far right of the template's row, click the ellipsis (...).
-
From the drop-down menu, select Delete.
-
In the confirmation popup, click Delete to permanently remove the selected branch template.
Best Practices
Keep It Simple: Avoid overly complex branching structures unless absolutely necessary. A clear and minimal setup reduces confusion, merge conflicts, and maintenance overhead.
Include a Testing Branch (QA): Create a QA or staging branch to isolate testing and validation activities. This helps ensure only stable code is promoted to production environments.
Automate Merges with CI/CD Tools: Use automation pipelines to handle merges, build, and deployment workflows. This minimizes manual intervention and ensures consistency across environments.
Document Branch Usage Clearly: Maintain a description for each branch in your documentation or repository README. This helps team members understand the purpose of each branch and how it fits into the overall workflow.
Protect Critical Branches: Enable branch protection rules (e.g., for master or main) to enforce policies such as code review, successful builds, or restricted access.
Regularly Review and Clean up Unused Branches: Archive or delete obsolete feature branches to keep the repository organized and manageable.
Align with Your Release Strategy: Design branches to match your release model (e.g., Git Flow, trunk-based development, release trains). This ensures consistency with how software is deployed and maintained.
| What's new? Add and Configure Technologies |
 Recommended Topics